• About

Caro's Pretty Things

~ My papercraft blog

Category Archives: Home decorating

Wonderful washi tape 

19 Sunday Apr 2015

Posted by Carolyn in Home decorating, Washi tape

≈ 1 Comment

Tags

covered notebooks, stationery, washi tape

I warned you there would be a few washi tape posts on the horizon! Here’s my next idea for using washi tape. 

I was in my kitchen looking at a notebook I keep on the bench for …. well …. writing notes (!) and decided it was far too boring and ugly, and maybe washi tape could be its friend? 

A few strips of tape later and here’s my new notebook:


I think next time I’d probably stick a piece of card stock underneath the tape as you can still see a little of the notebook cover peeking through, but I’m much happier having this lying around my kitchen now!

Next up I was doing some work and scribbling some notes in a journal I take with me to meetings.  I usually stick a post it flag on a page where I need to make a bookmark, but then it occurred to me … Washi tape!


 Much more stylish than a post it flag!  My brain is now ticking over with how else to bring my craft obsession into the office!!!

Who’d have thought you could have so much fun with a little roll of sticky tape?!?

Thanks for reading. 

Caro x 

Share this:

  • Click to share on Pinterest (Opens in new window) Pinterest
  • Click to share on X (Opens in new window) X
  • Click to share on Facebook (Opens in new window) Facebook
  • Click to email a link to a friend (Opens in new window) Email
  • More
  • Click to share on Reddit (Opens in new window) Reddit
  • Click to share on Tumblr (Opens in new window) Tumblr
Like Loading...

Washi tape adventures

18 Saturday Apr 2015

Posted by Carolyn in Home decorating, Washi tape

≈ 3 Comments

Tags

washi tape

Hi!

Two posts in quick succession. Don’t fall over with shock! Today’s post is a quick one, and probably the first of many involving washi tape in the next little while!  My lovely Mum gave me heaps of rolls for my birthday so now I’m going to enjoy finding lots of creative ways to use them! (For those who don’t know, washi tape is a kind of colourful paper sticky tape). 

My first foray was to put some on some iPod/iPad chargers to help me remember which is which and whose is who. 


They look so cute!  I’m so excited! We’re all about the pretty here at Caro’s Pretty Things. I can’t wait to figure out what other boring things around the house I can “pretty up”!

How cute does my charger look with my bag? 


 Stay tuned for some more washi tape adventures!

Thanks for reading. 

Caro x  

Share this:

  • Click to share on Pinterest (Opens in new window) Pinterest
  • Click to share on X (Opens in new window) X
  • Click to share on Facebook (Opens in new window) Facebook
  • Click to email a link to a friend (Opens in new window) Email
  • More
  • Click to share on Reddit (Opens in new window) Reddit
  • Click to share on Tumblr (Opens in new window) Tumblr
Like Loading...

Pretty-ing up the ordinary

08 Saturday Mar 2014

Posted by Carolyn in Home decorating, Thoughts and comments, Using up scraps

≈ 1 Comment

Tags

decorating jars, DSP notepads, Home decorating, using up scraps

Hello – thanks for visiting Caro’s Pretty Things!

In keeping with the name of this blog, I quite like taking ordinary things and making them a bit prettier.  For example, I can’t just take a normal note pad along to meetings, conferences etc, I need to have it look pretty!

Decorated note pads

See – much less boring!

It is amazing how ordinary, everyday things can be transformed with just a teeny bit of paper, glue and ribbon.   For example, who would want to keep rubber bands in a boring old jar when an old vitamin container with some DSP and some ribbon looks sooooo much nicer?!?

DSP decorated vitamin container

Why don’t you have a look around at home and see what stuff you have that could be given a new lease of life?

Thanks for reading

Caro x


Share this:

  • Click to share on Pinterest (Opens in new window) Pinterest
  • Click to share on X (Opens in new window) X
  • Click to share on Facebook (Opens in new window) Facebook
  • Click to email a link to a friend (Opens in new window) Email
  • More
  • Click to share on Reddit (Opens in new window) Reddit
  • Click to share on Tumblr (Opens in new window) Tumblr
Like Loading...

Easter Bunny treat boxes

04 Tuesday Mar 2014

Posted by Carolyn in 1 1/4 inch circle, 3/4 inch circle, 3D projects, Big Shot, Boxes, Candy Wrapper, Dies, Extra Large Oval, Gift bags, Home decorating, Kids party, Punches, Small Heart, Word Window

≈ Leave a comment

Tags

Candy Wrapper die, Easter, Easter Bunny, Easter craft, Easter crafts, Easter decorations, Easter gifts, Gift box, little Easter gift, Stampin Up

Hello

Given we’re starting to head towards thinking about Easter crafts I thought I would show you some pictures of some little Easter gift boxes I made last year for our Easter brunch.

Candy wrapper Bigz die easter treatsThese are made with the Stampin’ Up! Candy Wrapper Bigz Die which is retired from the current catalogue, but thankfully making a return at a whopping discount in the current Clearance Rack *.

Here is a close up of one:

Easter Bunny gift box

The eyes are made with circle punches, the nose is an upside down small heart punch, and the ears are made from the extra large oval punch and the word window punch (cut off). I drew on the whiskers but you could probably be fancy and use twine.

These looked so cute on the table and lots of mini eggs fitted beautifully inside.

I hope that kick starts you thinking of some cute Easter craft!  Thanks for reading.

Caro x

*As always, please let me know if you’d like to purchase any of the Stampin’ Up! products you see on my blog, or any of the other products in the catalogue for that matter 🙂

Share this:

  • Click to share on Pinterest (Opens in new window) Pinterest
  • Click to share on X (Opens in new window) X
  • Click to share on Facebook (Opens in new window) Facebook
  • Click to email a link to a friend (Opens in new window) Email
  • More
  • Click to share on Reddit (Opens in new window) Reddit
  • Click to share on Tumblr (Opens in new window) Tumblr
Like Loading...

Using magnetic sticky tape

03 Thursday Oct 2013

Posted by Carolyn in Home decorating, Thoughts and comments

≈ Leave a comment

Tags

ideas for magnetic tape, magnets for invitations

Hi

Is your fridge anything like mine?  Covered with art works, notes from school/daycare, reminders and birthday invitations?   And as a result, covered in magnets, some of which are gorgeous, maybe even matching, but some … well, kinda hideous?  And the fridge is getting progressively more scratched from all the magnets.

I have previously confessed to a slight addiction to looking for craft supplies in $2 shops. So much stuff, so little money!  A while ago I picked up a roll of magnetic sticky tape, as I was sure I’d find a use for it.  Right?

IMAG0200

My little boy and I have made a few magnets by sticking some tape to the back of punched out shapes, but the magnetic tape is not really strong enough to hold anything too heavy.   But watching him stick a birthday party invitation to the fridge the other day with yet another magnet, I had a great idea.  My roll of magnet tape!

So I’ve moved the roll of tape to a kitchen cupboard and I’ve started putting a small bit of tape onto the back of any notes, invitations etc I need to just have on the fridge for a short time – it’s brilliant!  So neat!

IMAG0199Am I obsessive?  Yep.  Is caring about magnets ridiculous? Probably!  Do I feel better?  Yep!  And I’ve finally found a use for that roll of magnetic tape 🙂

Here’s to an orderly fridge!

Caro

Share this:

  • Click to share on Pinterest (Opens in new window) Pinterest
  • Click to share on X (Opens in new window) X
  • Click to share on Facebook (Opens in new window) Facebook
  • Click to email a link to a friend (Opens in new window) Email
  • More
  • Click to share on Reddit (Opens in new window) Reddit
  • Click to share on Tumblr (Opens in new window) Tumblr
Like Loading...

Home made art gallery

03 Thursday Oct 2013

Posted by Carolyn in Home decorating, Thoughts and comments

≈ Leave a comment

Tags

hanging kids paintings, kids craft, mini art gallery

Hi.  Thanks for reading my blog 🙂

If you’ve been reading my blog for a while, you’ll know I have a small son.  He goes to daycare a few days a week and loves art and craft so much he often makes several paintings every day.   He brings them home proudly and then I am never sure what to do with his masterpieces!

I took him to an art exhibition last weekend and he was most intrigued by the concept of exhibiting paintings on the wall.  He wanted to know if he could bring his paintings in for an exhibition.   I had to explain why not – but it did give me an idea.  What if we made our own little art gallery at home?

A couple of clip boards and some 3M hanging strips later and voila – a mini art gallery to show off his art works!

IMAG0198

And here they are filled with his lovely art:

IMAG0201The thing I like about this is that we can change them around easily, add a new art work to the top every day, and the older ones can be discretely ‘filed’ (some in a book to keep for later and perhaps some in a slightly different ‘filing’ place!)

It is also a good way to get them out of the way if the paint is not quite dry.

I have to say I’m actually really liking having the extra colour on the walls, and it makes the kitchen look a little different each day, which is no bad thing.

I can also see this being a great idea for a mood board, or even a cheap way to get some colour on walls with a changing range of printed images or cuts outs from magazines.

Enjoy!

Caro x

PS I got these lovely steel clip boards at Officeworks.  Much nicer than the usual plastic ones!

Share this:

  • Click to share on Pinterest (Opens in new window) Pinterest
  • Click to share on X (Opens in new window) X
  • Click to share on Facebook (Opens in new window) Facebook
  • Click to email a link to a friend (Opens in new window) Email
  • More
  • Click to share on Reddit (Opens in new window) Reddit
  • Click to share on Tumblr (Opens in new window) Tumblr
Like Loading...

Christmas place mats

21 Wednesday Aug 2013

Posted by Carolyn in 3D projects, Home decorating, Uncategorized

≈ 1 Comment

Tags

Christmas in July, Happy Hour, ideas for laminating machines, papercraft, place mats, stampinup

The last few days I’ve shown you some of the decorations I made for our recent Christmas in July (in August!) celebration with some friends.  Today I wanted to show you some place mats I made:

20130815_165302

(sorry, the photo is a little crooked)

I used the Happy Hour stamp set from Stampin’ Up! for the details.  I used a gold Versamark ink pad for the drink cups.  I hand cut the candy cane and stuck it on the drink.  I used my Stampin’ Write markers (Garden Green and Riding Hood Red) to colour the holly stamp before stamping it on the side of the glass.   Here’s a close up of the images:

20130815_165235 I used an A4 piece of card stock as the red backing (using up some retired Riding Hood Red card stock) and a white piece of A4 where I’d cut 2cm off one long and one short side (ie, to get a 1cm border around all 4 sides).   I then stuck the white and red card together and ran them through a laminator to make the place mat.   They looked really cute all lined up together!

20130815_165728


Here’s a picture of the table with all the decorations on it:

photo-8Did you notice the stars in the soup bowls?  We used a star cookie cutter to make toast stars to float on top of the soup.   (The reverse pieces of bread with star holes were fun to fill with scrambled eggs for brunch the next day!)

I had a great time making all the decorations and we had such a fun dinner 🙂

Thanks for reading

Caro

PS There may be a few more Christmas craft details to show you – stay tuned!


Share this:

  • Click to share on Pinterest (Opens in new window) Pinterest
  • Click to share on X (Opens in new window) X
  • Click to share on Facebook (Opens in new window) Facebook
  • Click to email a link to a friend (Opens in new window) Email
  • More
  • Click to share on Reddit (Opens in new window) Reddit
  • Click to share on Tumblr (Opens in new window) Tumblr
Like Loading...

Papercraft napkin rings

20 Tuesday Aug 2013

Posted by Carolyn in 3D projects, Curly label, Home decorating, Petite curly label, Punches, Uncategorized

≈ 1 Comment

Tags

Christmas in July, napkin ring, papercraft, Santa belt

Hello!

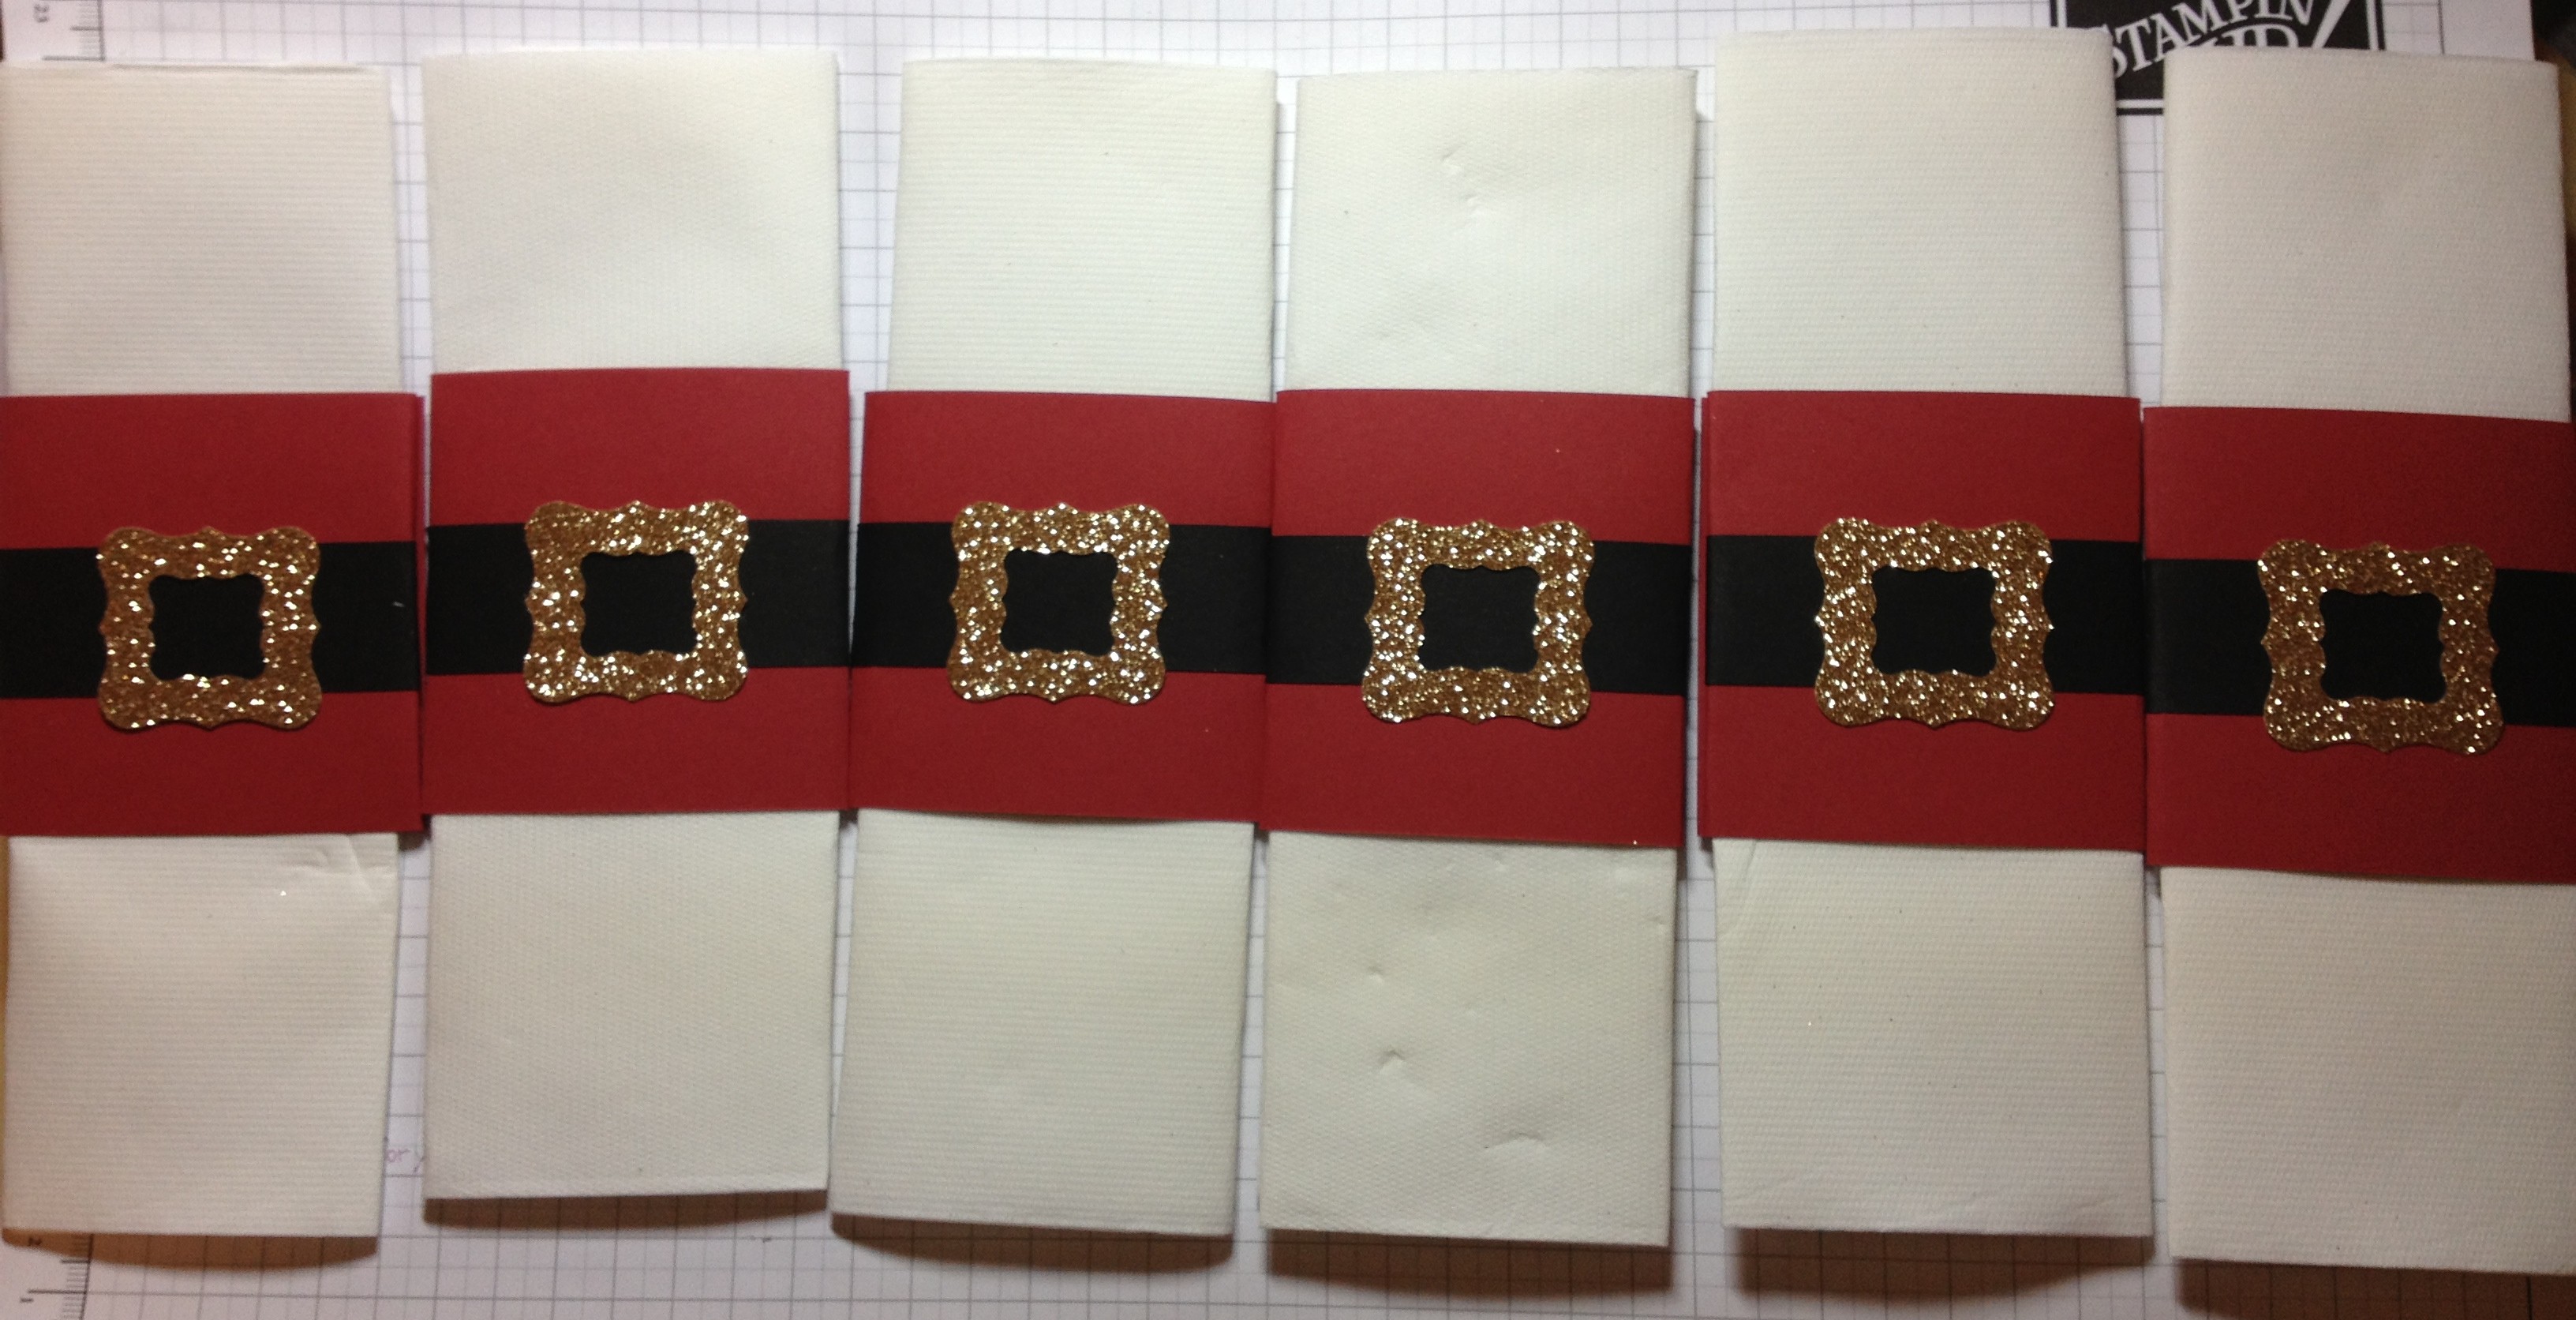
The last two posts I’ve showed you some of the craft I did for our recent delayed Christmas in July party.   Today I wanted to show you some more table decorations – this time Santa napkin rings!

photo-6

This idea came about when we were in a Christmas shop looking for Christmas crackers for our party.  I was looking at a Santa belt decoration and thought that it would make a great napkin ring.  I then went home and pulled out my punches to see whether I could come up with something similar.

The starting point was trying to figure out how to make the belt.   I tried my square punches and the decorative label punch but they weren’t quite right.  I then hit on the petite curly label and the curly label punch and they were perfect (all punches are by Stampin’ Up!).

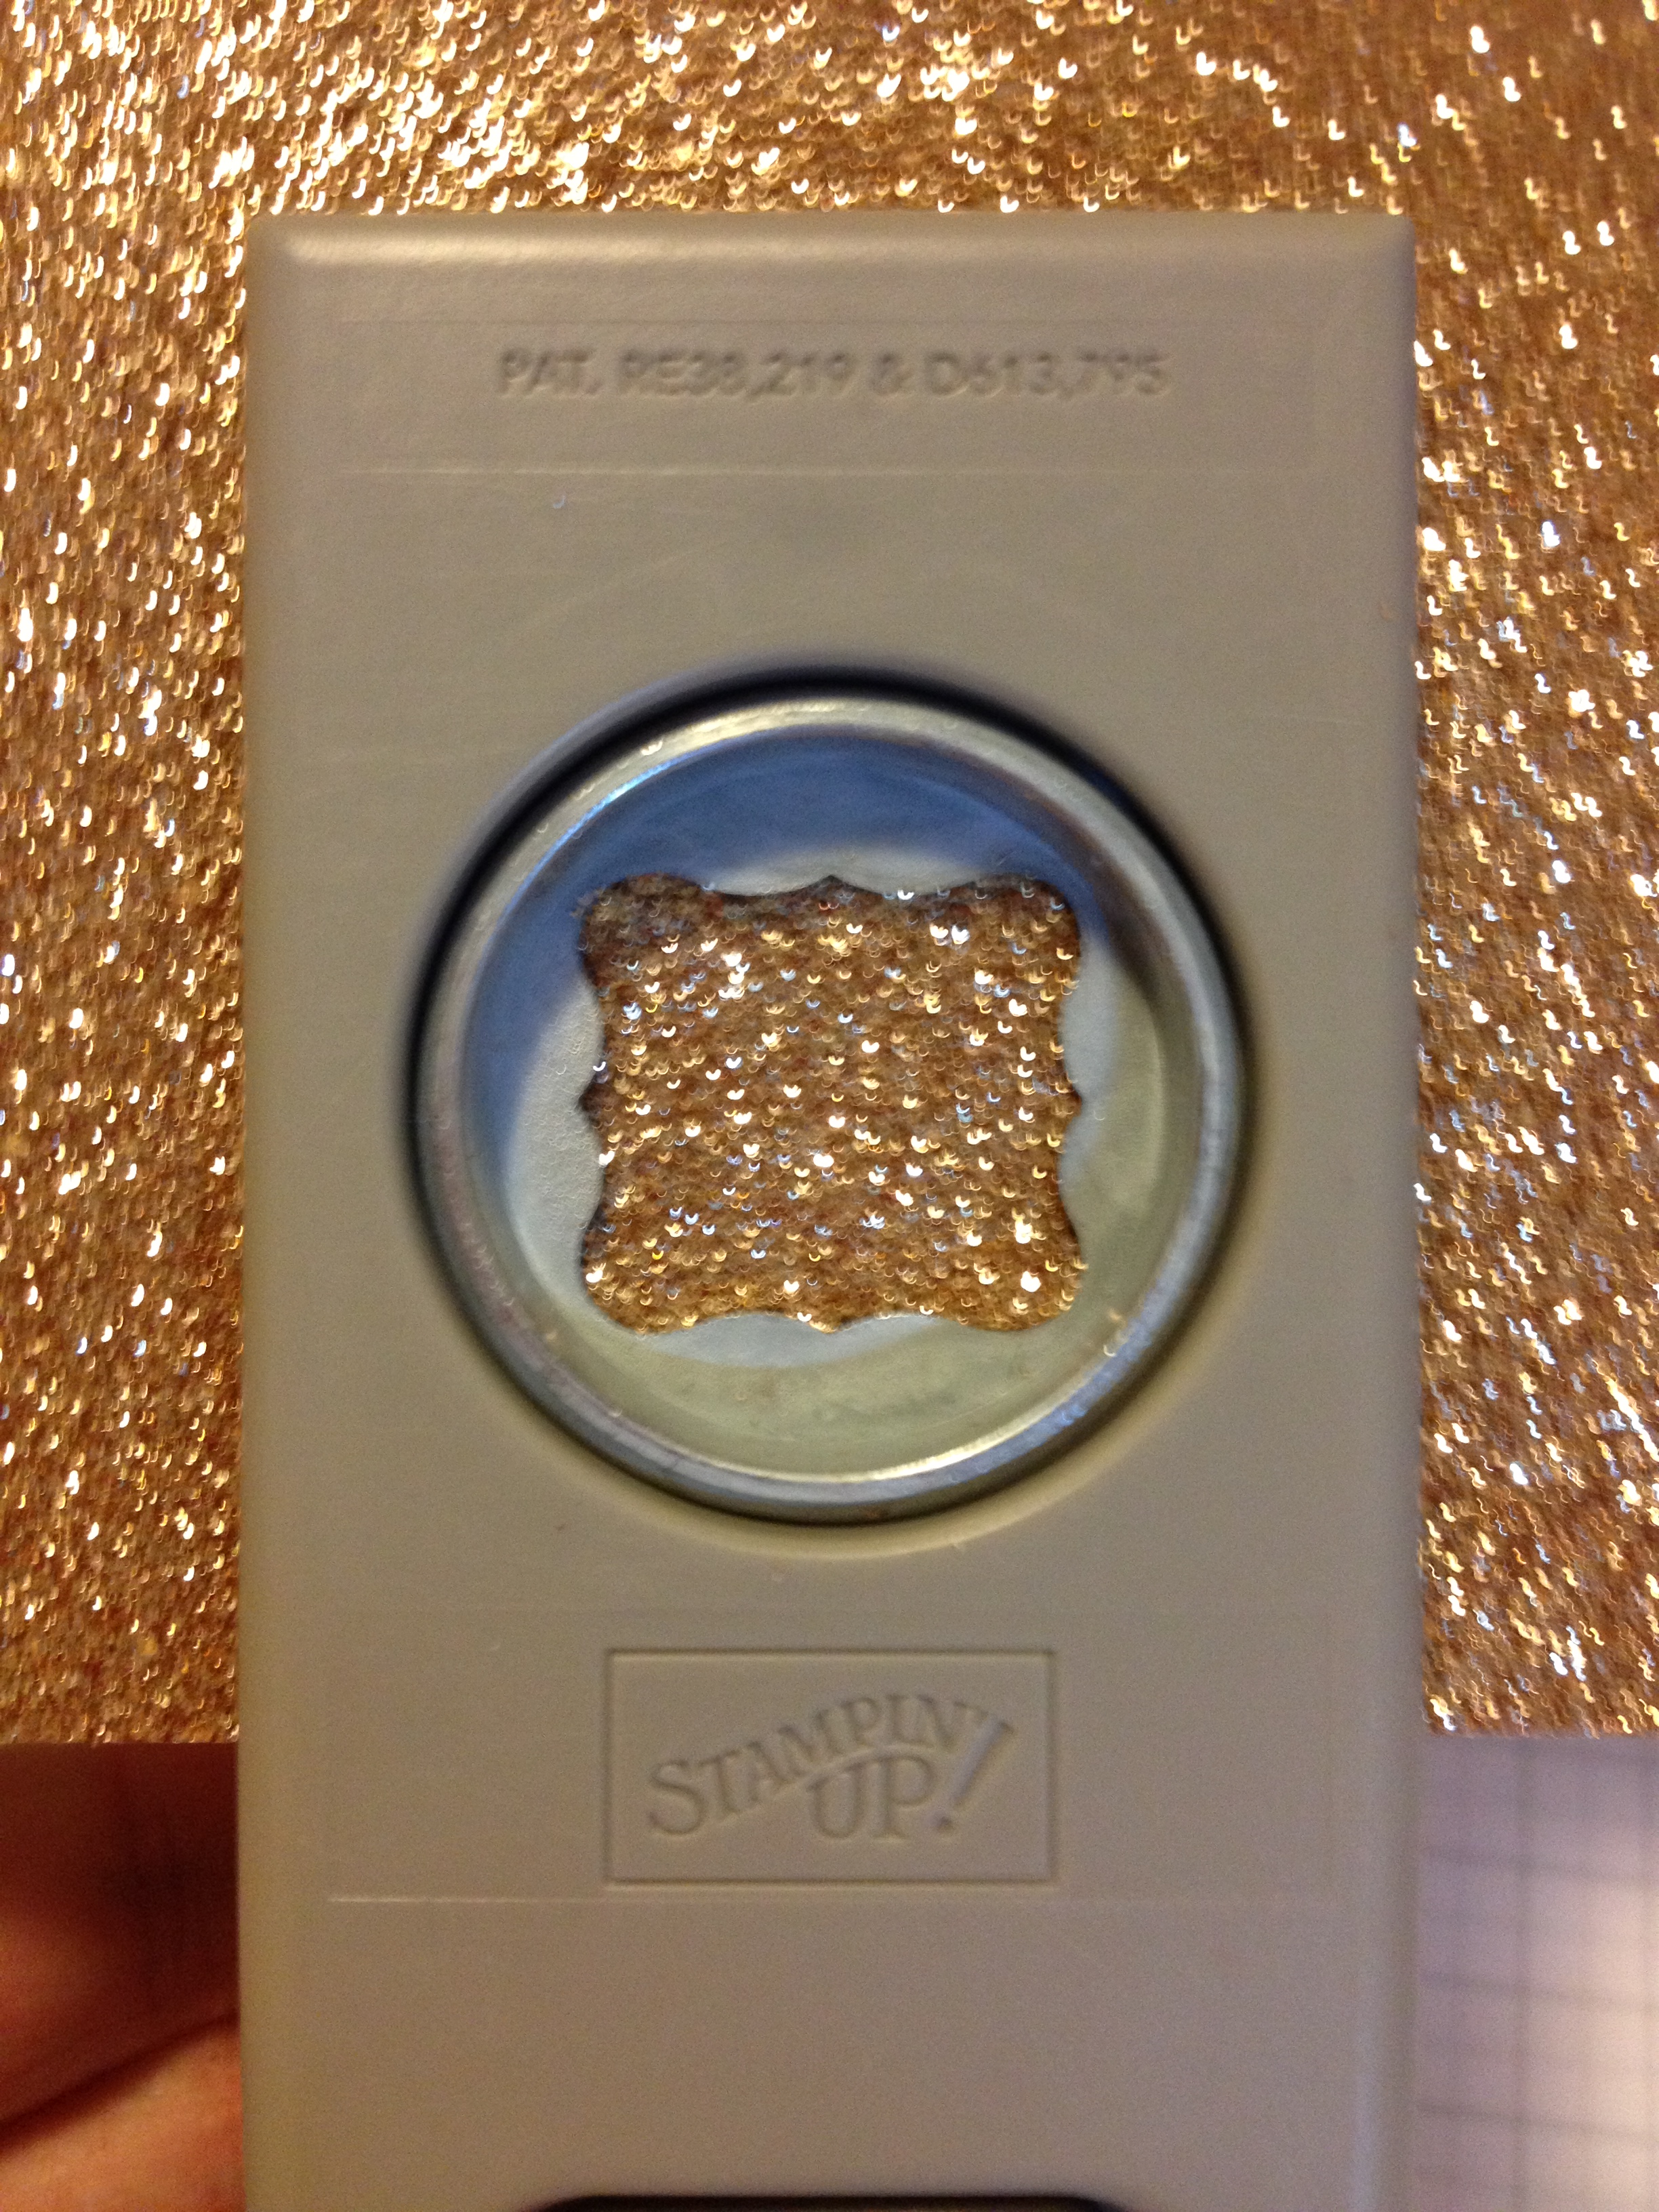
A little while ago I showed you how to make a frame with a scallop punch and circle punch.   I used the same technique here to make Santa’s belt.   First, punch the petite curly label punch …

photo-2

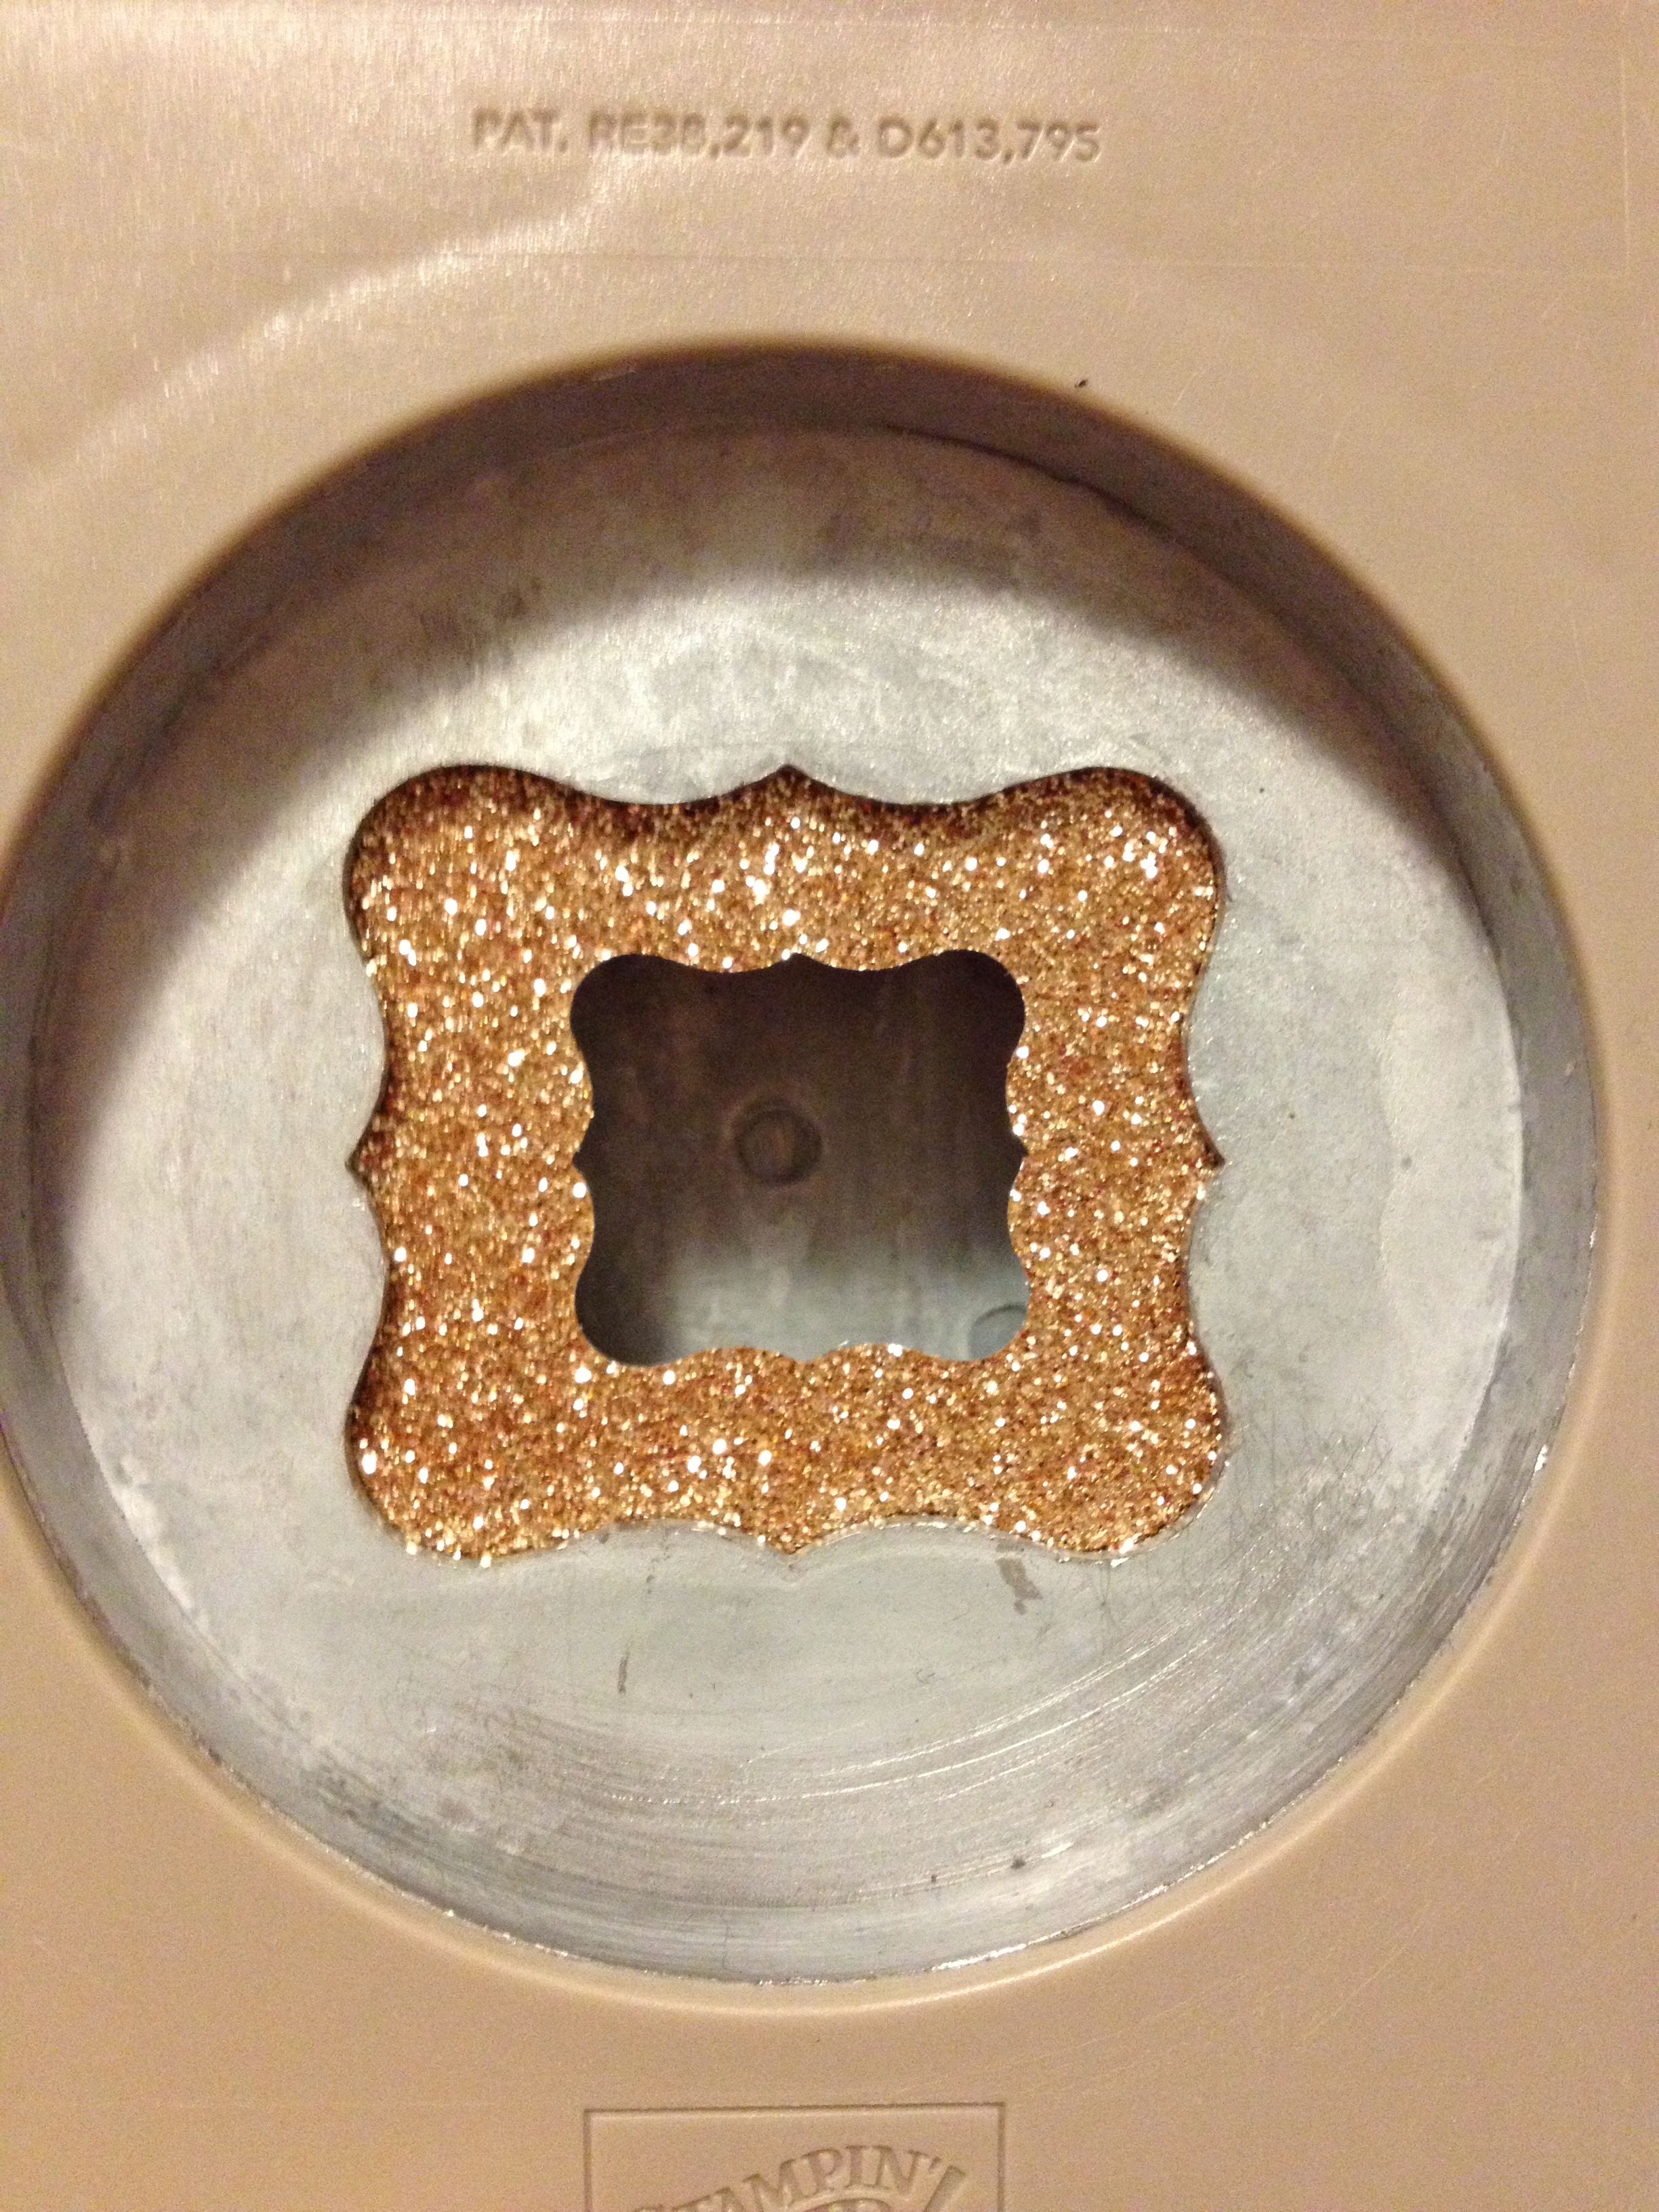
… and then punch around it with the curly label punch:

photo-5

And hey presto – Santa’s belt buckle made out of glittery glimmer paper!

I then had to figure out how to make Santa’s shirt and belt.   I started out with a napkin and my pile of Riding Hood Red offcuts to see what width of red looked right with the buckle in the middle.    I ended up with a red piece 7.5cm wide and 21cm long.   After a bit of fiddling around trying to work out whether to thread the black through the belt or not, I decided it would look best (and be easier!!) to just stick the buckle over the top of the belt.  So the black strip for the belt needed to be slightly narrower than the buckle, which worked out to be 2.5cm wide and 21 cm long.

photo-3I then centred the black strip and stuck it down:

photo-4

I then folded a napkin into thirds and wrapped the card around so it was just slightly loose and stuck it down.   I used both sticky strip and snail adhesive to make sure it stayed stuck!

photo-7I stuck the buckle over the belt and “ta da” – a Santa napkin ring!  They looked very cute all lined up together.

photo-8

I think something like this could also work as a belly band on a gift card holder or gift box as well.  Perhaps just the black belt and buckle wrapped around a red box/card?

I must say I’d never thought of making a napkin ring out of card stock before! Funny how inspiration strikes in the strangest places.  I’m now starting to think about ribbons, flowers, brads … I need to throw some more dinner parties to come up with new decorating ideas!

Thanks for reading.

Caro

Share this:

  • Click to share on Pinterest (Opens in new window) Pinterest
  • Click to share on X (Opens in new window) X
  • Click to share on Facebook (Opens in new window) Facebook
  • Click to email a link to a friend (Opens in new window) Email
  • More
  • Click to share on Reddit (Opens in new window) Reddit
  • Click to share on Tumblr (Opens in new window) Tumblr
Like Loading...

Rugby “Jesse Mogg” birthday card

13 Saturday Jul 2013

Posted by Carolyn in Birthday, Home decorating, Kids cards, Kids party, Uncategorized

≈ 2 Comments

Tags

cardmaking, Kids cards, kids party, Kids party ideas, rugby

Hello!

A while ago I showed you the invitations I made for my rugby obsessed little boy’s rugby themed birthday party.    The party was a great success and he had a ball.

He told me he wanted a Jesse Mogg birthday card (for those of you – most of you! – who have no idea who Jesse Mogg is, he plays for the Brumbies, my son’s favourite team)

Here is my effort:

photo-5

I used a paper cut out doll from a 2 dollar shop and coloured in the Brumbies colours.  Jesse Mogg is number 15.   A large oval punch substituted for a rugby ball shape – and he was very pleased with the end result!

In case any of you ever have to host a rugby/sports themed birthday party, I had a brain wave and turned a piece of green felt into a “field” table cloth:

photo

A few straws, some masking tape and some blu tak and we had some goal posts:

photo-1

I also have to show you the cake – I don’t even want to tell you how long it took to colour the blue icing and cut out all the letters!  My hands looked like Smurf hands by the end of it!

photo-2

Still – he had a *ball* (groan!) so all the effort was worth it in the end 🙂

Thanks for reading

Caro

Share this:

  • Click to share on Pinterest (Opens in new window) Pinterest
  • Click to share on X (Opens in new window) X
  • Click to share on Facebook (Opens in new window) Facebook
  • Click to email a link to a friend (Opens in new window) Email
  • More
  • Click to share on Reddit (Opens in new window) Reddit
  • Click to share on Tumblr (Opens in new window) Tumblr
Like Loading...

Home decorations with flower punches

26 Sunday May 2013

Posted by Carolyn in 1 3/4 inch scallop circle, 3D projects, Big Shot, Blossom, Boho Blossoms, Fancy Flower, Home decorating

≈ Leave a comment

Tags

3D, blossom punch, Boho Blossoms punch, circle punch, fancy flower punch, Home decorating, scallop punch

Hi there

Continuing my recent mission on using up paper from my enormous stash, my son and I recently decided to make some flowers I can keep in my office all the time.

photo-5

We used a variety of Stampin’ Up! punches – Blossom, Fancy Flower, Boho Blossoms, and various scallop and circle punches as well as some die cut flowers.   Stick them all together with glue and dimensionals to make flowers, and finish off with a button or brad in the centre.   We used Riding Hood Red, Cherry Cobbler, Bravo Burgundy and Poppy Parade (retired) card stock.

I attached these to ordinary kitchen skewers and put them inside an old vinegar bottle which had lovely leaf designs built into the glass.

Mr 3 is very pleased with the flowers in my office!

Share this:

  • Click to share on Pinterest (Opens in new window) Pinterest
  • Click to share on X (Opens in new window) X
  • Click to share on Facebook (Opens in new window) Facebook
  • Click to email a link to a friend (Opens in new window) Email
  • More
  • Click to share on Reddit (Opens in new window) Reddit
  • Click to share on Tumblr (Opens in new window) Tumblr
Like Loading...
Newer posts →

Carolyn Dalton

Independent Stampin Up! Demonstrator

Recent Posts

  • Pretty butterfly birthday card 
  • Adding an extra touch to a homemade envelope
  • Quick and easy masculine card 
  • Quick and easy kids card
  • Butterfly soap card

Archives

  • March 2016
  • February 2016
  • January 2016
  • December 2015
  • November 2015
  • October 2015
  • September 2015
  • August 2015
  • July 2015
  • June 2015
  • May 2015
  • April 2015
  • September 2014
  • July 2014
  • April 2014
  • March 2014
  • February 2014
  • November 2013
  • October 2013
  • September 2013
  • August 2013
  • July 2013
  • June 2013
  • May 2013
  • May 2012

Categories

  • 1 1/4 inch circle
  • 1 3/4 circle
  • 1 3/4 inch scallop circle
  • 1 3/8 circle
  • 1 inch circle
  • 1 inch square
  • 2 3/8 inch scallop punch
  • 3/4 inch circle
  • 3D / pop up
  • 3D projects
  • Anniversary
  • Baby cards
  • Beautiful Butterflies
  • Big Shot
  • Bird Builder
  • Birthday
  • Bitty Butterfly
  • Blossom
  • Blossom Builder
  • Boho Blossoms
  • Boxes
  • Butterfly (retired)
  • Candy Wrapper
  • Card sets
  • Cards
  • Chalk Talk
  • Christmas
  • Circle Thinlits
  • Circle treat cups
  • Circles #2
  • Corner rounder
  • Cupcake Builder
  • Cupcakes and other tasty treats
  • Curly label
  • Decorative Label
  • Dies
  • Elegant Butterly
  • Embossing folders
  • Envelopes
  • Extra Large Oval
  • Fancy Flower
  • Framelits
  • Full heart
  • General occasion
  • Gift bags
  • Gift bow
  • Gift card holders
  • Gift tags & wrapping
  • Home decorating
  • Horizontal Slot
  • Invitations
  • Jewellery tag
  • Kids cards
  • Kids craft ideas
  • Kids party
  • Labels collection
  • Large Oval
  • Love notes
  • Masculine
  • Mini scallop
  • Modern Label
  • Music Notes
  • Notebooks
  • Owl
  • Perfect Polka Dots
  • Petite curly label
  • Pinwheel die
  • Punches
  • Scallop circle
  • Scallop edge
  • Scallop envelope
  • Scallop oval
  • Scallop Tag Topper
  • Small Heart
  • Square Lattice
  • Star
  • Sweet treat cups
  • Tag
  • Tasteful Trim
  • Thank you
  • Thoughts and comments
  • Top Note
  • Tutorial
  • Uncategorized
  • Using up scraps
  • Washi tape
  • Wedding cards
  • Wheels
  • Wildflower Meadow
  • Word Window

Pinterest

Follow Me on Pinterest

Follow me on Twitter

My Tweets

Enter your email address to follow this blog and receive notifications of new posts by email.

Join 26 other subscribers

Create a free website or blog at WordPress.com.

Privacy & Cookies: This site uses cookies. By continuing to use this website, you agree to their use.
To find out more, including how to control cookies, see here: Cookie Policy
  • Subscribe Subscribed
    • Caro's Pretty Things
    • Join 26 other subscribers
    • Already have a WordPress.com account? Log in now.
    • Caro's Pretty Things
    • Subscribe Subscribed
    • Sign up
    • Log in
    • Report this content
    • View site in Reader
    • Manage subscriptions
    • Collapse this bar
 

Loading Comments...
 

    %d